Nerf: It's what's for dinner.
...no wait, that isn't right.
Nerf: when you care enough to send the very best...
no, not that either.
Nerf: The happiest place on earth.
I feel like I'm getting closer. One last try:
Nerf: don't leave home without it.
hmmm, perhaps I'll get it figured out by the end of this. However it goes, what good is playing with Nerf guns if you have nothing to shoot at? Godzilla (he's 8 and doesn't care for the nickname much any more, we're going to have to come up with something new soon)loves his Nerf guns. We've amassed a small stockpile of arms over the last few years, and he keeps a small tactical bag full of empty TP rolls and water bottles to set on ledges for target practice. It works, well enough, but we usually end up with these "targets" littering the floor when he's done and he constantly has to stop to reset the range. So the time came when we had to step up our game. This is how we took Nerf target shooting to a whole new level.
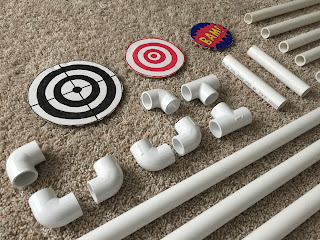
It starts with PVC pipe, and it ends with cardboard. I know, it's a long parts list, but I have confidence you can keep up. Seriously, the whole thing came together for about $10.
The boys and I ran out to Lowes one morning and gathered the pipe we needed. It's a simple frame, with stabilizing legs on either side of the base. We started with 2, 10 foot 3/4 inch pipes, and enough 90 degree and "T" fittings to make all the joints. You could use a smaller diameter pipe, but you will lose some of the rigidity of the frame, so we stuck with 3/4 inch. You also need to pick up three 1 inch to 3/4 inch "T" fittings. These will slide loosely over the top bar of your frame and allow the targets to swing freely when hit with the Nerf dart. The smaller opening on these fittings will still fit snugly to your pipe and serve as the arm which will hold your eventual targets.
 To assemble the Nerf target rig, measure and cut your PVC carefully. Our legs are about 3.5 feet tall, with a 3 foot gap, and 8 inch feet. Be sure when you are planning the lengths, to account for the target arms. We went a little taller than we should have, and ended up needing to use part of a third pipe we already had laying around the house to finish filling out the target arms. Once everything is cut to size, simply dry assemble the rig by sliding the pipes into the fittings, making sure to press them securely into place. You can use an adhesive if you don't want to ever take it apart, but we've found it's nice to be able to take the feet off to store the rig under a bed or at the back of a closet.
When it comes to the targets, you need some stiff corrugated cardboard and a child with the desire to draw or at least color in concentric circles. My daughter busted out some markers and a few coffee cans/tape rolls/paint cans to get the ball rolling on targets to hang, and eventually, we had a full range of targets to hang. I even knocked out a classic comic "BAM!" to add to the mix. To get the targets on your rig, slice tiny wedges into the PVC target arms. They need to be thick enough at the opening to slide the cardboard into, but thin enough up the pipe to hold it snugly.
All that is left now, is to set it up and load up your Nerf gun, then watch the darts fly! Oh, and I remember how the saying goes now:
Nerf: Mikey likes it!


